Practice hand 1
Important bit at the start
You will need to refer to your Helpcard for this lesson. Print it out and follow the process carefully and soon it will become second nature.
The best way to get the most out of these practice hands is to get yourself a pack of cards and deal out the hands as they appear in the diagrams.
Follow the hands as they are being played so you can see what cards are left in each hand. If you are very ambitious, try to replay the hands as if the bidding had gone differently or other cards had been played.
Part 1 - The Bidding

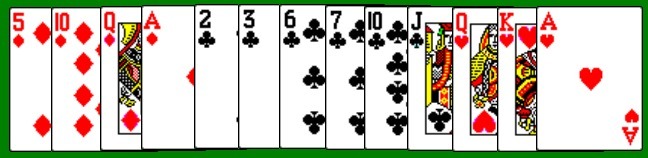
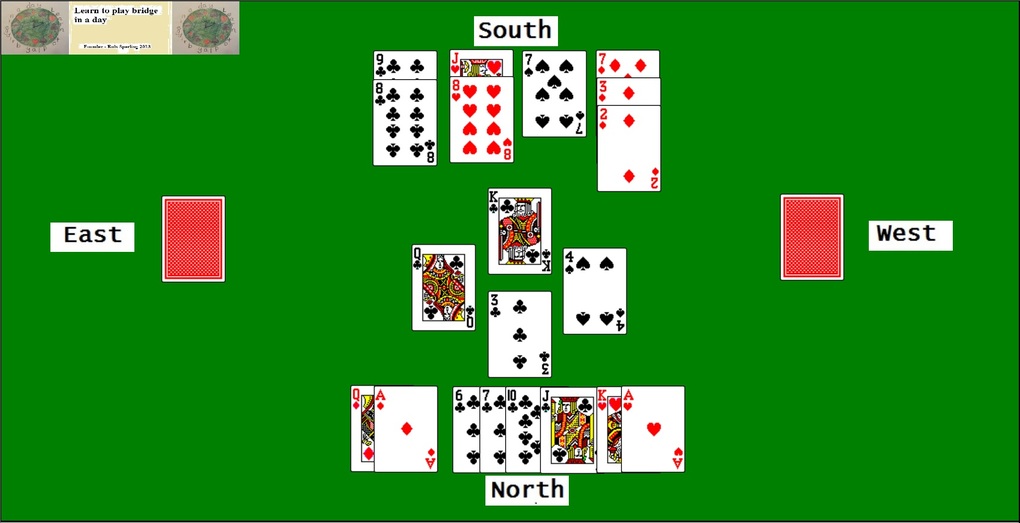
You are south. You have sorted your hand in to suits (as per helpcard 1 - Sort your hand into suits) and as this is a practice hand, I have shown you what cards are in the other players hands as above.
Your partner, north dealt and bids 2 clubs. East then bids 2 diamonds. What do you do?
South

Look at helpcard 2 - Count your hand points
1 ace = 4 points
2 kings = 6 points
1 jack = 1 point
Your hand count is 11 points
There is no need to look at helpcard 3 - Opening the bidding as your partner did that.
Look at helpcard 4 - Respond to your partner's bid
As your hand count is 11, you should bid at the first possible level. Bid 3 clubs.
West decides the level is too high and passes. What should your partner North now bid?
North
Look at helpcard 5 - Bid for game
- Count combined partnership points
North should count the combined partnerhip points. North has 22 points and knows that you have between 6 - 14 points. The combined partnership points are 28 - 36.
North has 6 clubs and knows that you have at least 4 clubs because you bid them. With 10 clubs between you, clubs are your best suit.
- Decide whether to go for game
Game in clubs requires 29 or more points so North should see game as very possible even if South has the minimum 6 points.
Game in no trumps only requires 26 points but should not be an option as North has no spades.
North must bid as game is possible. North has 3 main choices:
- North could bid 3 diamonds to show strength in diamonds just in case you can support a no trump bid - but with no spades, this should not be an option as you north has no spades
- North could bid 4 clubs asking you whether your hand is strong enough for game - but you could pass
- North could bid 5 clubs which is a 'game bid' which seems the safe and strong option
North bids 5 clubs. East passes. What do you bid?
South

Look at helpcard 5 - Bid for game
- Count combined partnership points
You have 11 points. Your partner has between 18-24 points. You have a combined partnership of 29 - 35 points
You have at least 8 clubs between you.
- Decide whether to go for game
In this case your only thought is whether to stick at game or go for slam.
For the sheer thrill, you could go for slam but you will be taking a risk. Your partner would need to have at least 22 pts, which is unlikely (but true). In this case you decide to stick with 5 clubs and pass.
Your final contract is 5 clubs. You must now make 11 tricks with clubs as trumps.
Part 2 - The play
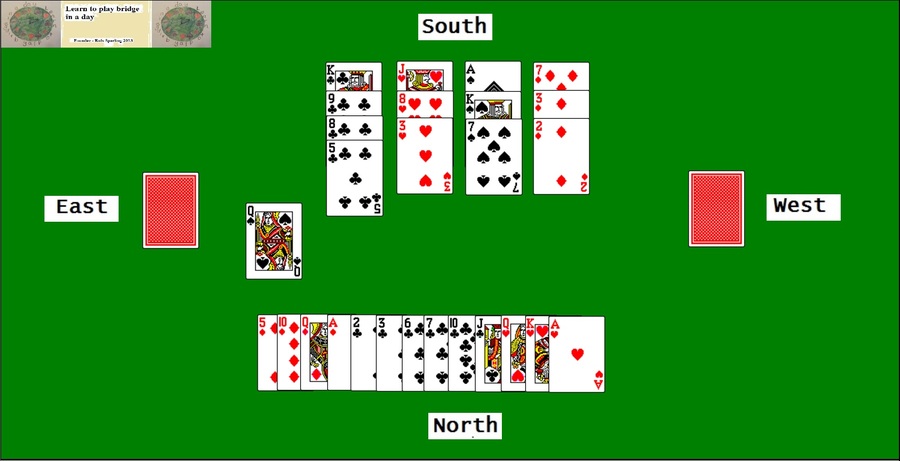
As north was first to bid clubs, they are now the declarer and you are the dummy. That wouldn't help you practice however so I now want you to be north. East leads the queen of spades. South lays out their hand and the table looks like this:
Look at helpcard 8 - Play
| North |
East |
South |
West |
| 2♣ |
2♦ |
3♣ |
Pass |
| 5♣ |
Pass |
Pass |
Pass |
You and your partner are signed up to a 5 clubs contract. You have to make 11 tricks with clubs as trumps. East has led the queen of spades. Before you play your first card from dummy, ask your self:
- How many winners have you got in:
-
- Spades
- Hearts
- Diamonds
- Clubs
In this hand, you should have 2 spade winners, 3 heart winners, 1 diamond winner and at least 4 winners in clubs as trumps.
- Do I need extra tricks to make my contract
Yes, but just 1
- How can I get that extra trick
In this hand there are 2 possible extra tricks. You could try and finesse the queen of diamonds or you could hope to make an extra club.
- Should I remove opponent's trumps
As declarer, you will normally have more trumps than your opponents. It is always a wise move at the earliest opportunity to remove opponents trumps where possible. In this case, it is possible and you should play trumps at the earliest opportunity.
Now lets play the hand.
You are South and the declarer.
You play the king of spades which is the lowest card certain to win the trick, unless trumped. East plays the lowest of their spades the 2. You have no spades so can discard your lowest diamond the 5.
Your plan that you made includes getting rid of your opponents trumps as soon as possible. You could play a club from dummy but if you do, you are more likely to lose 2 club tricks rather than 1.
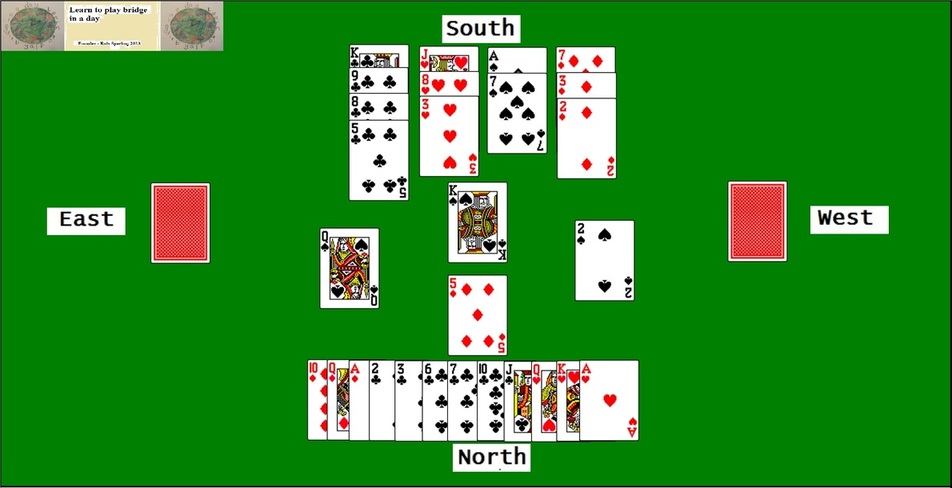
In this case, play a heart from dummy to take in your hand and then lead a club.

You play a small club from hand and in this case, west sees no sense in playing the queen of clubs so plays the ace.

Poor west has nowhere to go now and leads their spade which you win in dummy.
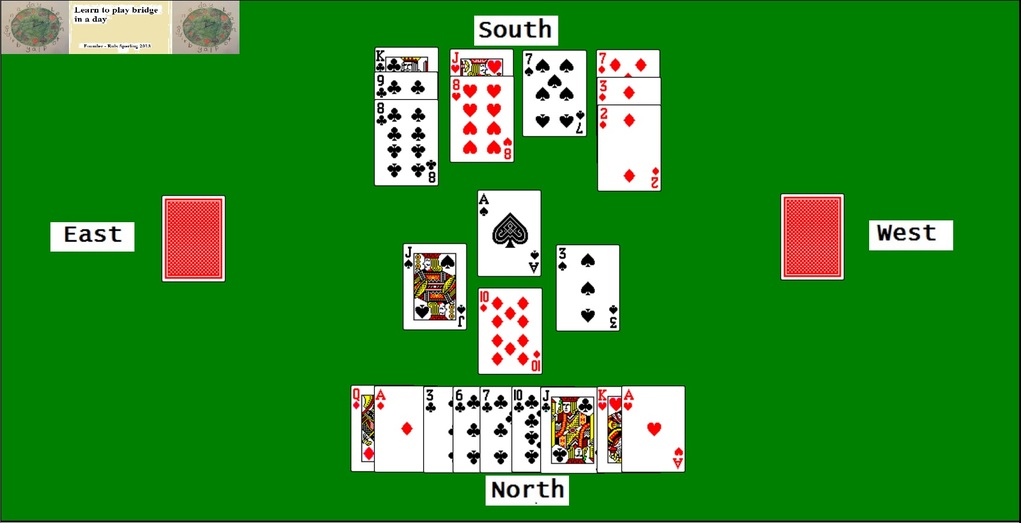
You now need to complete your removing of opponents trumps by playing the king of clubs from dummy.
You have only lost one of your club tricks and now is the time to try the finesse. Lead a small diamond.

In this case, the king has fallen early. It couldn't have worked out better. You win the trick and now all your remaining cards cannot be beaten. You have made your contract and 1 overtrick.
Now try playing the cards from here. You should win all the remaining tricks. There is only one possible way you can play the cards which will result in you losing a trick.
if you want to know what it is then please email me.
card play examples

Home
Copyright © August 2013 Rols Sperling
All rights reserved. Please e-mail Rols if you want to use any of the materials on this site.
|